Showing posts with label darkroomphoto. Show all posts

Thursday, 12 December 2013

Large Format Printing


This photo was one I had taken about three years ago with a Holga camera. I took a photo of a mosque at Arab Street and double exposed it with a wall pattern of flowers. For the printing of this photo I set the contrast at 4.5 and exposed it with the red filter for 30 seconds.


This photo was taken by a 35mm film camera of two of my dogs outside. For the printing of this photo I also set the contrast at 4.5 and exposed it with the red filter for 45 seconds. Also, to make everything except the dog on the left darker, I used dodging. 

Shutter Speed Project


For this project we had to photograph motion either frozen or blurred. To do this we would change the shutter speed on our cameras.


These two photos that showed motion blurred. The first is of one of my dogs barking and the second is of my other dog moving. I believe I used a shutter speed of around 1/30. Although the photos are already blurred, I with I had put a slower shutter speed so that the photos would be more blurred.


These two photos are my frozen motion photos. I took them of SAS students running on the track during their PE classes. For these photos I used a very fast shutter speed of 1/100. In the first photo the students are running and in the second photo the students are walking. In the second photo I got a few strange marks that appeared. Above the students, there is a bunch of flecks and on the right of the photo there seem to be shapes of people.

Wednesday, 30 October 2013

Texture Film Project


This photo is of a wooden paper cutter with a grid in the art room, so it had a wooden and grid texture on it. Because of this grid, which is evenly spaced out, the composition is harmoniously organized. Since the negative of this photo came out really dark I had to increase the contrast when I printed it.


This photo is of a recycling bag within a cardboard box, so it showed a strange thick fabric texture. I would say that this is purely chaotic because there isn't really any order in it, the bag is randomly folded and the background is mostly just shadows. This was my favourite print I did for this project because of the bag's details which can be seen clearly.


This is a photo of a carpet, so it mostly showed a texture made up of geometric shapes. Because it seems to contain patterns, such as the parallel lines on the top left and the geometric shapes on the sides and bottom,  but also has a bird in the middle I would say that it's harmoniously disorganized. Although I liked this photo, I felt like it came out a bit blurry in the end  in some parts.

Sunday, 20 October 2013

35mm Camera Texture Project Inspiration


(Photo from Kool Cats Photography on Flickr)

I really like wooden textures so I used this photo as inspiration. I believe this one is harmoniously disorganized because the wooden planks are placed next to each other  and they have a latch holding them together, but the wood and paint seems to be crumbling apart. So I plan to take a photo of something with a wooden texture for one of my photos.

(Photo from KaliPhoto.net)

I like this purely chaotic texture because of the random shapes and the whimsicality and strangeness of it. Even without colour, the fluid texture would still look really cool. So for this I would like to take a photo of mixed paint or something similar to get a texture like the one in the photo.

(Photo from allegrophotography.com)

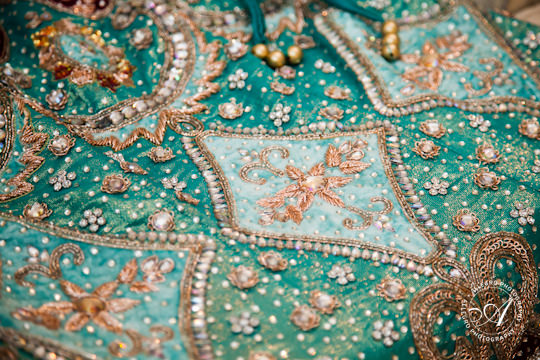
This photo is of an Indian fabric which I believe is harmoniously disorganized because it doesn't seem to have a single distinct pattern, but instead has multiple things going on which all go together. To get a similar texture I would like to take photos of different kinds of fabrics or maybe take photos of some Indian clothing which I have.


Photo Journal Entry #2


Thursday, 10 October 2013

Holga Project


This project was a bit stressful for me because it was my first time actually developing film, and the first two times I tried to do it, my film didn't come out for some reason. So, it took me three tries to finally develop it and even then most of my film came out too dark to use. It was also a challenge to put the film in the reel because we weren't able to look at it.


This photo is of my friend lying down near a window. The negative of this photo came out pretty dark, so I had to increase the contrast quite a bit. Originally, her face came out too dark so I had to use the dodging technique to make it lighter.


This photo was of the tie dyed shirts drying on Good Vibes Day. The negative for this also came out quite dark, so I had to increase the contrast and make it very high. Unfortunately, the photo came out a bit unfocused, but I liked it because it gave it a bit of an eerie feel.


This was a photo of a sleeping cat that I took. The photo for this unfortunately came out a bit blurry.


Monday, 16 September 2013

Photogram Photography

For this project we would take some photo paper and place either physical objects or transparencies on top of them and their outlines and some details would show up. 


For this photogram I placed some plastic dollar bills on top of the photo paper. Since they are plastic, thin, and had some transparent bits, you could see the many details on both sides of the bills. This was probably my favourite because they ended up looking really cool, especially since, for whatever reason, some bits would come out blurry sometimes.


For this self-portrait, I printed out a photo of myself onto a transparency and placed it on top of the photo paper. I tried really hard to get the full spectrum of light to dark shades, but for some reason, I couldn't get many white areas.


This was an Imitation of a Photogram by Melanie K. First I created the image on Photoshop using different brushes and then I printed it out onto a transparency and used it to create the image. Like my self-portrait, I couldn't get this photogram to show any white areas. I think I should've made the image darker on photoshop so that less light could've passed through.

Tuesday, 27 August 2013

Pinhole Camera


These are some photos I took with my pinhole camera. We created it in darkroom photography class with black cardboard paper and a piece of tin foil with a small hole. Depending on the brightness of the particular environment, we would keep the shutter open for a certain mount of time to make sure the photo paper was exposed the right amount.


This photo is of an SAS schoolbus. To take this photo, we went outside and placed the camera on the floor and waited.


This photo is of a tree decorated with baubles at the ecogarden. For this one, I just placed the camera on the floor looking up.


This photo is of the water at the ecogarden as well.

After taking the photos, which were negatives, we placed them on top of photo paper the same size and shot light over them to make them into positives.